

Hi friends , hope you remember I had shown a small quilling handmade bag in my earlier articles. This is a bag which is more sturdy and can be used for daily shopping. A beautiful , attractive and Eco friendly handmade paper decorated with paper quilled flowers or designs for your special ones. This is a multipurpose bag made of handmade sheet ( kg cardboard ) decorated with quilling. It can also be used to present gift on special occasions. Paper bags are environment friendly and are good alternate for plastic bags.
Now I will show you how to make a paper bag using chart paper in few steps. You can take a thin / thick chart paper.
Materials required are :
- Chart paper ( Any color but let it be in contrast with the quilling design color )
- Fevicol
- Scissors
- Handle for the bag
- Punching machine
- Quilling strips
- Quilling needle / comb
- Washer
The step by step procedure is explained below.
- Take a chart paper and cut it into size 55 X 40 cm. You can change the paper size as per your requirement.
- Fold it on both sides ( One side 17 cm and other side 12 cm ) as shown in Step 1 and Step 2..
- Paste the two overlapped sides together with fevicol. Please refer to Step 3.
- Allow it to dry.

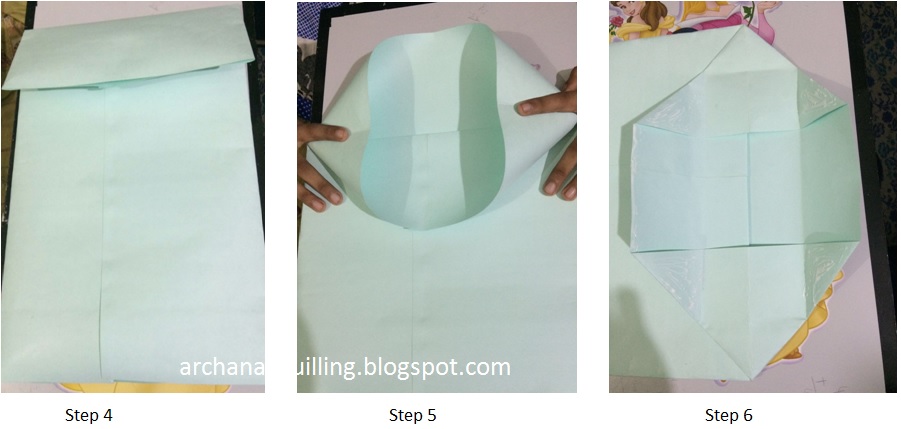
- Fold the bottom of the bag for a length of around 2 inch ( Refer to Step 4 ). If you increase this , your bag size will be big. You can fold it according to the size of the bag you are making.
- Unfold the last fold. Fold upwards to form a triangular shaped edge as shown.
- Fold the flap inwards and flatten it. ( Step 5 and Step 6
- Paste the two flaps together using fevicol so that the base is firm.
- Fold both sides of the paper lengthwise as shown in Step 10.The thickness of the fold will determine the space inside the bag.
- Make the fold according to the width of your bag.

- Open the folds and along the creases make fold inwards on both the sides as shown:
 |
- Using a punching machine, make two holes on both sides of the bag. Please refer to Step 12.
Please note : To make the bag more strong (bag with just holes on paper are likely to tear under load), I have used a washer ( Step 14 ) which you have to stick on all the punched holes or you can even rivet each hole. Please refer to the pictures below.

Once your bag is ready , you can decorate it using various designs or quilling comb flowers in your own way. As you can see , I have made some quilling flowers and decorated it on the handmade bag.
The complete handmade bag looks like this:

Please share your comments on how this carry bag was useful to you.
Awesome idea..
ReplyDeleteEco friendly stylish paper bag
ReplyDelete