

Hi everyone , after making such beautiful quilling flowers where do we arrange them ? We can decorate them in a vase. And how about creating a flower vase using quilling ? Wow !!! Sounds interesting !! Yes that is what I am showing in this article. This quilling vase looks very beautiful and elegant. This vase is environment friendly as well.
The complete making of the quilling vase is divided into two parts :
- The upper part
- The lower part.
To make this vase you mainly need :
- 10 mm quilling strips ( two different colors )
- Quilling needle
- Fevicol
Upper part :
For the upper part of the vase I have used yellow color quilling strips . You can choose any color of your choice. Here I have attached 40 quilling strips . The number of strips depends on the size of your vase.You can vary ( increase / decrease ) it according to your vase size.
- Take a 10 mm yellow color quilling strip ( Step 1 )
- Apply fevicol at the edge.
- Attach another quilling strip to it.
- Same way attach 40 strips.
- Make a tight coil ( Step 2 )
As it is difficult to roll 40 strips altogether , you can roll 10 strips at a time , make a coil . Again attach 10 strips and so on ... This will make the coiling easier.
Do not apply fevicol on the top and bottom of the coil. Do not allow the coil to become loose. If your coil becomes loose , you will not be able to give the correct shape to your vase.
Using your thumb , gently push the central part of the coil to give it a pot shape. Please refer to Step 3. Make sure the base is flat . To make the base flat , you can gently press the end of the pot against a flat surface. Apply fevicol inside the pot to make it firm , applying fevicol keeps the vase in shape and allow it to dry.

The inner part of the vase look like the picture shown below :

Lower part :
For the lower part of the vase I have used dark green color quilling strips . You can choose any color of your choice. Here I have attached 15 quilling strips . The number of quilling strips depends on the size of your vase . You can vary ( increase / decrease ) it according to your choice.
- Take a 10 mm dark green color quilling strip ( Step 4 )
- Apply fevicol at the edge.
- Attach another quilling strip to it.
- Same way attach 15 quilling strips.
- Make a tight coil ( Step 5 )
Using your thumb , gently push the central part of the coil to give it a pot shape. Please refer to Step 6. Make sure the base is flat . To make the base flat , you can gently press the end of the pot against a flat surface.
Apply fevicol inside the pot to make it firm. Applying fevicol keeps the vase in shape. Allow it to dry.

The inner part looks like the picture shown below :


The inner part looks like the picture shown below :

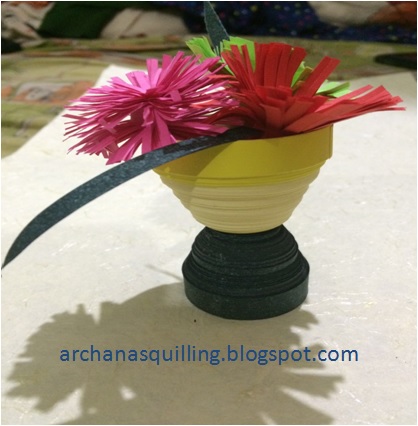
Once both the parts are dried , stick one on top of the other in the pattern shown in the picture.

Your beautiful quilling vase is ready. Once vase is done, now you can add a nice shine to the flower vase by applying some quilling varnish. For that I have used clear nail polish. This will make your vase water proof and strong.

Your beautiful quilling vase is ready. Once vase is done, now you can add a nice shine to the flower vase by applying some quilling varnish. For that I have used clear nail polish. This will make your vase water proof and strong.
Place some colorful quilling flowers in your vase and it will make a beautiful piece of decor for your home. Your complete vase will look like this :

Please watch the video for step by step procedure on how to make a quilled vase and decorate it with flowers.
I have also made a miniature vase as shown below . For this I have used multi color quilling strips.

You can also gift your beautiful vase to your love. For making different type of quilling flowers , you can refer to the link below on "How to make quilling flowers"
I hope you liked my creativity. Please share your views and comments on this beautiful art piece.
Very nice flower vase in quilling keep the good work going , eager to see more posts on different vases
ReplyDeleteVery nice flower vase Innovative idea
ReplyDeletevery niceand beautiful flower vase
ReplyDeleteGreat idea. Keep it going..
ReplyDeleteVery nice creayivy yaar.wonderful ideas.lovely.i love ur all quilling.great archana
ReplyDelete